Showing posts with label DIY. Show all posts

DIY Tailored Valances


Well, I was going to write a tutorial on how I made these, but then I realized that I just combined a few other people's tutorials and they probably explained things much better than I could. So I figured I'd just link to their tutorials and give any tips and tricks I picked up while making them. (Also I made these over a year ago and just got the photos off my camera yesterday, so the details are a bit fuzzy. Whoops.)

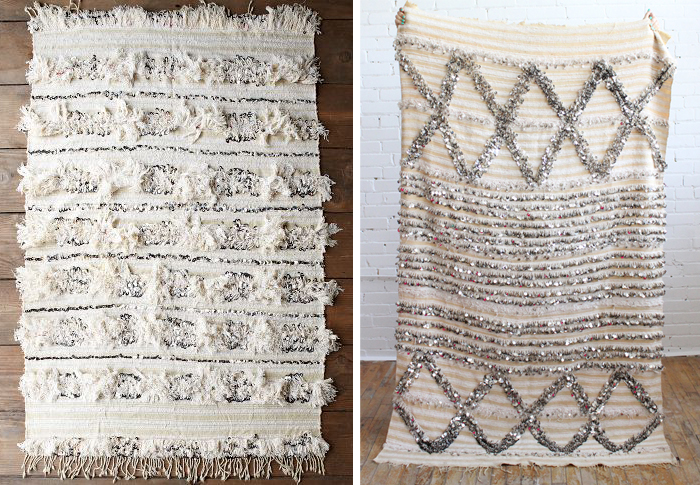
DIY Moroccan Wedding Blanket Inspired Throw Tutorial

Gold and Glitter Sprayed Pine Cones


Well hello there! How did it become Christmas already? Isn't it still October? In any case, I have a super easy DIY project to share to add some shine to rustic holiday decor. 

DIY Gold Tipped Antlers


I have a fun, ridiculously easy DIY project to share today. Is it just me, or do other people's husbands/boyfriends have an excessive amount of deer antler sheds just lying around their house? Because I've already decorated with at least three, and I keep finding more in random boxes. (Also, for those of you who didn't grow up in the wilderness, these bits of antlers are called shed and fall off deer naturally. My husband usually picks them up off the ground when he goes camping). This is such a ridiculously easy way to get a rustic glam look. (Meanwhile, my husband is trying not to fall over as I desecrate these hallowed treasures.)


Step 1. Locate a shed. Apparently these are even for sale on ebay. I seem to have a million of them in random closets and boxes. But if you aren't related to or dating an outdoor aficionado you can sometimes find them at flea markets or antique shops.


Step 2: Tape off the area you want to spray. If you have terrible aim like me, poke holes in a plastic bag to cover the rest of the antler like some sort of bizarre plastic buffalo. It's awesome.


Step 3: Spray the antlers with gold spray paint and let dry. Caution: this stuff is strangely addicting and you may be hit with the sudden urge to spray paint everything gold. Dresser knobs, picture frames, your dog...(just kidding on that last one!!)


Step 4: Suuuuuper carefully peel off the tape and prance around your house holding the antler aloft showing off your beautiful tchotchke. Or, you know, behave like a normal person and just stick it on a dresser somewhere. But make sure to look at it appreciatively every now and then, because it is a pretty cool object.

DIY fabric headboard


I've been waiting a long time to get halfway decent photos of this headboard. We made it back in our old house, and the sage green fabric didn't match the tan walls of our bedroom at all. But I had a vision of someday having a peaceful white bedroom and I knew the headboard would be exactly what we needed. It just took us 6 months to get there! But now we're finally to the point of putting our new bedroom together and it's glorious! As a bonus, this headboard tutorial is ridiculously easy. 

Materials needed:
plywood cut to length of your bed and height that you want
quilt batting - enough to cover plywood
fabric - enough to cover plywood 
two 2x4s cut to height of headboard legs (I got a 2x4x8 and cut it in half to create two 4 ft tall legs)
staple gun

First measure the width of your mattress. Then figure out if you want the headboard to extend past the mattress. Add those measurements together to get the total length to cut the plywood. For example, our mattress is 75 inches wide and I wanted the headboard to extend 3 inches on each side of the bed. So our total width is 75 + 6 = 81 inches wide. 

Then figure out how tall you want the headboard to be. This isn't critical because you can adjust the height on the legs. I wanted our headboard to be 32" tall not including the legs, so I made that the plywood height measurement. 

Take these measurements and cut the plywood to size (ours was 81x32"). If you don't have a saw, your friendly Home Depot or Lowes employees can cut it to size for you. 

Cut the 2x4s down to size depending on how tall you want the legs to be (again, I had a 2x4x8 and had them cut it in half so each leg was 4 feet tall). 


Lay the batting on the floor, making sure there are at least 2 layers of batting to cover the entire piece of wood. Lay the wood on top of the batting, pull the batting tight around the edges and staple in place. Make sure the batting lays flat and there isn't any bunching or pulling. 


Once the batting is in place, lay the fabric face down on the floor. Lay the batting covered headboard onto the fabric, again making sure there's no bunching or pulling.


Be careful and check the front often to make sure everything is straight, especially if you are using a fabric with a print. Don't be afraid to use a lot of staples to hold the fabric down. 


Now comes the time to determine how tall you want the headboard to be. I wanted mine to be a bit taller, so I calculated the total measurement of 52 inches. I subtracted the height of the plywood (32 inches) from the total height of 52 inches to get 20 inches. I marked 20 inches up on each 2x4 and lined that mark up with the bottom of the plywood. Then nail or screw the legs into the board, making sure the nails/screws don't go through to the other side and wreck your hard work! 

Stand the headboard up to make sure it's even and then haul it into your bedroom! You can screw it into your bed frame (as I intend to do eventually) or just lean it up against the wall for now. 

It was so ridiculously easy, I don't know why we put off making it for so long.  As you can see, we've also added bedside lights and curtains to our bedroom! Now just to add some artwork above the bed and I think our master bedroom is getting pretty close to being finished! 


DIY Wine Glass Stemware Rack


This little DIY wine glass shelf came from a complete lack of storage space in the kitchen and our crazy collection of glasses. I wanted a fun way to display our stemware, and what's better than a stemware shelf? The few wine glass racks I could find that were also shelves were fairly expensive, so I decided to make one myself.  It was fairly easy to make, although it did get me locked out of the house for 2 hours one night. Just make sure you don't do that too. 

Materials:
Stemware rack from Crate and Barrel
Thin sheet of wood (Home Depot will cut it to size for free!)
Paint - Glidden in "Softest Juniper"
4 screws


I started with this unfinished stemware rack from Crate and Barrel and the thinnest piece of wood that I could find at Home Depot. I think it's actually meant to be a bottom of a drawer. Home Depot will cut the wood for free, so I had them cut it to the exact measurements of the shelf. 


I then painted it Glidden's "Softest Juniper" which is a great minty green. Both pieces of the wood were unfinished, so I applied 2 coats and sanded the edges just a bit to give it a worn look. 


Once everything was dry, I used wood glue to attach the top of the shelf to the rack. (This was the day I locked myself out of the house. I recommend you skip that part) 


Once the glue had dried, we measured and marked where the brackets would screw into the shelf. Note - make sure the screws are long enough to go into the wood, but not long enough that they stick out the other side since it will impede the bottom of the glasses from sliding into the racks. 


And that was it! Then we just flipped it over and attached it to the wall. 


I love how this shelf now displays both our stemware as well as our stemless glasses and Kace's beer mugs. It saves cabinet space and is great over a little bar or bar cart. 

DIY Rustic Wooden Headboard


I don't know about you, but I've completely fallen in love with all those rustic headboards on Pinterest. However, having moved from the land of barns to the land of cacti I no longer have access to any perfectly weathered gray barn boards to make said projects. Enter the cedar fence slats. They're light, the perfect thickness, and easily cut down to size by your handy Home Depot or Lowe's worker if you don't own a saw.

Materials for a queen size bed:
6 cedar fence slats from Home Depot - have them cut to 63" long
2 two by fours for the legs - have them cut to 48" long
1 one by four cut to 32 inches for the center brace (or 1 inch shorter than the total height of the boards)
nails
wood glue 
Minwax Water Based Pre Stain Wood Conditioner
Minwax Water Based Stain in Toffee
Ploycrylic Protective Finish
Rags for wiping stain on and off
Paint/foam brushes


 Start with the boards cut to the size you need. For a queen size bed, the length of my boards was 63 inches. We sanded them all down to remove any splinters. This can either take a few minutes if you have an electric hand sander, or a few weeks if your husband won't let you buy one and promises to sand them all himself and then keeps forgetting. Ahem. Once (eventually) sanded I took a hammer to some of boards to give them that beaten, weathered look you just don't get from new cuts of lumber.

Note - the boards I used are cedar fence slats. Cedar smells. I happen to love the scent of cedar but if you don't, you might want to think about using a different type of wood. It's been in our house for 6 months now and every time you enter the room you can still detect a faint woodsy cedar smell. Like I said, I love it because it makes me think of forests and the outdoors. But it doesn't go away quickly, so make sure you're ok with that!


I used a water based stain for this project since I have an irrational fear of mineral spirits and don't want to use it to clean up regular wood stain. Minwax has a water based stain that comes as a clear tint and you add the color like you would a regular can of paint. I think it worked great and I had no trouble using it. I used the Pre-Stain Wood conditioner on the wood first to give it an even finish. I didn't use this on the headboard legs since they wouldn't be seen, and you can definitely tell the difference between the boards where I used the pre-stain and where I didn't. The boards had a much cleaner and even coloration when I used the conditioner first. 


I used 2 coats front and back of the "Toffee" color. After everything dried I finished it with a topcoat of Ploycrylic to protect and seal everything. Stain the slats and the 2 boards for the legs. I also stained the center brace because why not? This was my first time staining anything and I just followed the instructions on the cans. It worked beautifully.


Once everything dries it's time to assemble. Lay the boards out how you want them to go. Mine didn't line up perfectly, but I liked the warping and thought it added character. If you want yours to lay perfectly, check how the boards fit at the store before you buy them. 

Once everything is lined up, flip each of the boards over so the back of the headboard is facing up. Run a line of wood glue along the center brace and place perpendicular to the slats in the center of the board. Stack something heavy on top to weigh it down until the glue dries. See the photo below? The brace is under the middle bag of charcoal. My husband we have a lot of charcoal. Also, random dumbbells. 


Here's where it gets tricky. I wanted to nail the boards to the legs from the front so I could line up the nail heads. To do that, before I flipped the board back over, I lined up the legs and marked with chalk where I wanted the lowest board to land and made sure everything was level. Then I turned the whole thing over and slid the legs underneath, lining up the lowest board with the chalk marks. 

Note - I measured my bed frame and figured out exactly how far apart the holes were to screw in a headboard. If you don't want to screw the board directly to your frame, it's less important where the legs of the headboard go. 


Once I had the boards lined up, I nailed each of them to both the legs and the center brace. Then all that's left to do is screw it into the bed frame or attach it to the wall!


DIY Dress Form Cover


So this is Lizzie. I've had her for years and she's been my trusty sewing and fit companion and has saved me many pin related injuries - even though she's not quite the same shape as me. She's your typical adjustable dress form that has exposed fit dials and gaps between the plastic plates when you adjust it. The problem is, Lizzie's getting a bit worn and ugly looking. Adjustable dress forms tend to be fairly ugly to begin with so I figured I'd make Lizzie a new dress. Or, um, skin? It was incredibly easy, and didn't involve a serger, even though we're working with stretchy material.

DIY Adjustable Dress Form Slipcover

Materials:

  • 1 yard of super stretchy fabric such as jersey knit or the fabrics in the dance/swim section of your local fabric store
  • Thread - I used white thread with black fabric so I could show what I was doing. You might want yours to match the fabric. Or not, it's your call. 
  • Sewing machine (or you can do it by hand if you have more patience than me)
  • Pins
  • Scissors


Drape fabric onto the dress form and pin one side tight starting from the arm hole and going down to the bottom of the form. Leave a little extra material hanging on the bottom.


Pin the other side of the dress form so the fabric lays smooth and tight across both the front and back. Work or stretch the material as needed to make sure everything is nice and smooth.

Optional - to make it easier to sew, I used chalk to draw a line over the pins on each side. When I sewed the fabric together, I was able to follow the chalk line as well as the pins.


Sew the sides together using a loose zig zag stitch. You don't want to use a straight stitch here since the fabric will stretch and the thread won't, which can result in wrinkles and pulling. A zig zag stitch allows the fabric to move and stretch a little so you can easily get the cover on and off your dress form. Trim the excess fabric.


Put the tube of fabric back on your dress form inside out, matching the seams up with the sides of the form. Then start pinning the shoulder seams, starting at the outside shoulder and working your way up to the neck hole. Again, work the fabric so there are no wrinkles or tucks when you sew it together.  I also used chalk to mark the seams here.

Sew the shoulders together and trim the excess fabric. Leave the neck hole open (you can sew it closed, but the top of my dress form has a nifty little pin cushion attached and I wanted to be able to access that).


Put the cover onto your dress form right side out. Trim around the neck and tuck in the edges to make it look pretty.


Then take a needle and thread and run a very loose gathering stitch around the bottom of the material. Pull the ends of the thread tight so the extra material on the bottom is gathered up under the dress form. Tie off the knot.


And there you go - easy dress form cover without a serger!